studio buildout series part 1: the room
- August 8th, 2012
- Posted in diy . studio
- Write comment
Building out home studios has become de rigueur for musicians of all kinds of levels. Some people are building out new rooms, converting garages, spending lots of money and basically going the pro route, often without expecting to make any money at all. If you have that sort of dosh: well done.
But if you don’t, the good news is that you don’t have to spend that much.
First, start with the room. You need to make your room sound good. I can’t stress this enough. In fact, I already have, back in June, in a big post how rooms affect sound. If you missed that, you should check the link. Go on, we’ll wait.
Back? Good. For those who cheated and didn’t click, the picosummary is simple: if the room isn’t quiet – if it’s reflective, if it has angles and does weird muddying things to sound – all of that will show up in the recording, and no amount of good equipment will fix it.
In fact, as Jeff Bohnhoff is fond of pointing out, good recording equipment will make a bad room worse, because your better equipment will pick up all the flaws and present them to you in perfect clarity.
Don’t record here

So start by finding the least bad room you have. It should be quiet, and not strangely shaped. Play music in it – what you want to record, and existing recordings that sound like what you want to record – and find the room in which it sounds as good as it can, given the equipment you’re using.
Then you have to realise that even your best room won’t actually be good for microphone-based recording. Walls and ceilings are reflective; they add reverb, echos, strange sound bounces, all sorts of artefacts in the sound. In playback, that sometimes can make things sound better! And sometimes, you’ll capture a room’s sound on purpose. Great Big Sea did a bunch of recording in a Louisiana chapel for parts of their last album, to capture the sound of that room.
But you’re not Great Big Sea, and most of the time you don’t want that. Particularly on our kind of budget, it’s best to get “dry” recordings.
“Dry” recordings are recordings that sound only like a capture of the instrument. No reflections, no room-reverb, no sound wave interference, no anything else. It should ideally sound as if the instrument were played in an infinitely large room with no reflections at all.
The reason you want to do this is that it’s simply much easier to add room-like effects in software than take them back out. A dry recording lets you add reverb and phase shifting and such with ease, and also with whatever flexibility your digital audio workstation will afford you. A wet recording – well, you’re just stuck with it. Want less reverb? NOT FOR YOU!
Therefore, most of your room prep should involve dampening the room’s native sound down as far as you can. Part of that is eliminating all noise sources, of course (including your computer’s fan and your cell phone’s RF noise), but just as much, it involves damping down all kinds of sound reflections within the room.
The expensive way to do this is line the room with sound-absorbing foam.
We can’t afford this, either.

That sort of thing is great, but expensive, so I go with movable sound baffling panels that I can build instead.
Sound baffles are semi-rigid panels that absorb sound. They can be fairly expensive if you buy professional studio versions, but, of course, that’s not how we roll here. Conveniently, I already have a video on how to make ultra-cheap sound baffles! Enjoy:
I also don’t try to panel the whole room. Instead, I semi-surround myself with large sound baffles, positioned opposite and around me, with the mic between me and them. I’ll have another panel behind me. If the first thing your primary sound waves hit is a sound-absorber, there’s dramatically less left over to bounce around the room, and another panel directly behind tends to finish off the remainders. Your milage will of course vary, dependant upon how your individual room behaves.
If you’re having problems with bass reflectivity and standing-wave effects – common in corners – you can make highly effective bass traps. Bass traps are bass-specific sound baffles, and can be really important in corners where you get weird standing-wave action going on.
It can manifest all sorts of ways, but if your low end sounds distorted or wibby or just odd? It’s probably manifesting, and you need to dampen it down until the room sounds good.
Jeff has a recipe for cheap bass traps: buy some Corning 703 rigid fibreglass and wrap it in a couple of layers of thin, non-reflective fabric. The fibreglass itself is pretty rigid, so holds together well without the necessity of a frame. Place these in corners, whereever walls meet.
This is one approach:
Again, click the image for more math
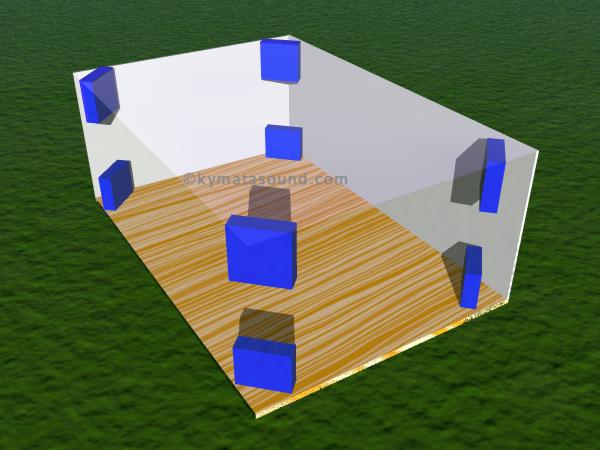
Another approach is to make columnar bass traps and stand them vertically in the corners. They’re more work to make, but easier to set up and move around. Pick your approach based upon your circumstances.
In the end, this will take some experimentation. You’re customising for the room you have, and that’ll just take some fiddling. But eventually, you’ll find you’re starting to get recordings that sound right. Then just keep dampening and improving until you have the room sound – or lack thereof – that you want.
And voila! You’ve built a really good foundation for recording. It’s a bit tedious, but it’ll pay off in saved time and better sound throughout.
Next time: studio monitors! Which is to say, speakers for your studio. You don’t want to do all your mixing on headphones, kids, and we’ll talk about why, and how you can DIY yourself up some pretty damn good monitors.
This post is part of The DIY Studio Buildout Series, on building out a home recording studio.

2 comments on Livejournal.
Wow, this is cool. I learned something already–again I am reminded that decisions made well at the start carry you past a lot of problems you would need to fix later. Much as I dislike that other topic and would have loved to read your thoughts, this DIY stuff is gold. Thank you!
Belatedly, thanks! 😀